Battery switch on travel trailer function is crucial for managing your RV’s power. Understanding how these switches work—whether single, dual, or selector—is key to safe and efficient power distribution. This guide breaks down the different types, how to connect and disconnect batteries safely, troubleshooting common issues, and essential maintenance tips. We’ll also cover power management strategies and safety regulations to keep your travel trailer running smoothly.
From properly grounding your system to understanding the interaction between your battery switch, solar panels, and inverter, we’ll cover everything you need to know to confidently manage your RV’s power. We’ll even walk you through troubleshooting steps using a multimeter, so you can tackle minor problems yourself. This guide is your one-stop shop for all things related to your travel trailer’s battery switch.
Battery Switch Types in Travel Trailers
Choosing the right battery switch for your travel trailer is crucial for managing your power sources and preventing electrical issues. Understanding the different types available will help you make an informed decision based on your specific needs and setup. This section will Artikel the common types, their functionalities, and their respective pros and cons.
Single Battery Switch
A single battery switch is the simplest type. It’s a single on/off switch that controls the power flow from your trailer’s battery to the 12-volt systems. When the switch is on, power flows freely; when it’s off, all 12-volt circuits are disconnected, preventing battery drain. This is suitable for trailers with a single battery and minimal power demands.
Dual Battery Switch
Dual battery switches allow you to control two separate batteries independently. This is common in trailers with both a house battery (for interior appliances) and a starting battery (for the tow vehicle). The switch typically has three positions: “Both,” “House,” and “Start.” “Both” connects both batteries in parallel, providing maximum power. “House” connects only the house battery to the 12-volt system, preserving the starting battery.
“Start” connects only the starting battery. This setup offers flexibility and prevents draining the starting battery.
Selector Battery Switch
Selector switches are more complex and provide greater control. They allow you to select which battery (or combination of batteries) powers the 12-volt system. Some selector switches even include an “off” position to completely disconnect all batteries. This level of control is beneficial for managing multiple batteries and prioritizing power usage. For example, you might use one battery for essential lights and another for larger appliances.
Comparison of Battery Switch Types
| Feature | Single Switch | Dual Switch | Selector Switch |
|---|---|---|---|
| Number of Batteries Controlled | One | Two | Two or more |
| Power Control | On/Off | Both, House, Start | Multiple selectable configurations, including off |
| Cost | Low | Medium | High |
| Installation Complexity | Low | Medium | High |
| Applications | Simple trailers with one battery | Trailers with separate house and starting batteries | Complex setups with multiple batteries and power needs |
Troubleshooting Common Battery Switch Issues
Your travel trailer’s battery switch is a crucial component, controlling power flow to your house batteries. Problems with this switch can leave you without lights, appliances, or even the ability to charge your batteries. Understanding common issues and how to troubleshoot them is essential for maintaining your RV’s power system.
Identifying Common Battery Switch Problems
Several issues can arise with your travel trailer’s battery switch. These often manifest as a complete lack of power, blown fuses, or visible signs of corrosion. A blown fuse is usually indicated by a broken filament visible through the fuse’s clear plastic window. Corrosion appears as a green or white buildup on the terminals and switch itself, hindering electrical conductivity.
No power could stem from a faulty switch, a blown fuse, corroded connections, or even a problem with the battery itself.
Troubleshooting Steps and Diagnostics
Before starting any troubleshooting, always disconnect the negative battery terminal to prevent accidental shocks. This is a critical safety precaution. The first step is a visual inspection of the switch and its connections for any signs of damage or corrosion. Clean any corrosion with a wire brush and baking soda solution, ensuring all connections are tight and secure.
Next, check the fuse(s) associated with the battery switch. Replace any blown fuses with the correct amperage rating.
Using a Multimeter for Diagnostics
A multimeter is invaluable for diagnosing battery switch problems. With the switch in the “off” position, check the voltage across the battery terminals. You should read the battery’s voltage (e.g., 12.6V for a fully charged 12V battery). If you don’t get a reading, there’s a problem with the battery itself or its connections. With the switch in the “on” position, measure the voltage at the output terminals of the switch.
If you read the battery voltage, the switch is working. If the voltage is zero, the switch is faulty or there’s a problem in the wiring between the switch and the output terminals. If you have multiple battery banks, repeat this process for each bank. Always follow the multimeter’s instructions for proper use.
Solutions for Fixing Common Malfunctions
Cleaning corrosion is often a simple fix. Tightening loose connections can also resolve many issues. Replacing blown fuses is straightforward and essential. However, if the switch itself is faulty, it needs to be replaced. This usually involves removing the old switch, ensuring all connections are clean, and carefully installing the new switch.
If you’re uncomfortable working with electrical systems, consult a qualified RV technician.
Troubleshooting Flowchart
This flowchart visually guides you through the troubleshooting process:
Start: No Power to Travel Trailer
Okay, so you’re dealing with your travel trailer’s battery, right? Understanding the battery switch on travel trailer function is key to keeping your lights and appliances running smoothly. This switch controls power flow to your house batteries, preventing drain when you’re not using the trailer. It’s super important to know how to use it properly, and battery switch on travel trailer function guides can be really helpful in understanding the nuances of your specific setup.
Make sure to check your owner’s manual for details specific to your model, but these online resources can be a great starting point.
1. Check Battery Voltage: Is the battery charged? (Yes/No)
Yes: Proceed to step
2. No: Charge or replace the battery.
2. Inspect Battery Switch and Connections: Corrosion or loose connections? (Yes/No)
Yes: Clean corrosion and tighten connections. Retest. No: Proceed to step 3.
3. Check Fuses: Blown fuse(s)? (Yes/No)
Yes: Replace fuse(s) with the correct amperage. Retest. No: Proceed to step 4.
4. Use Multimeter: Test voltage at switch input and output. Is there voltage at the input but not the output? (Yes/No)
Yes: Replace the battery switch. No: Check wiring for breaks or shorts. Consult a professional.
End: Power restored or professional help required.
Battery Switch and Power Management
The battery switch is the central nervous system of your travel trailer’s power, acting as a crucial component in managing power flow and conserving your battery’s precious juice. It’s more than just an on/off switch; it’s a gatekeeper, strategically directing power to where it’s needed most, ensuring efficient energy use and preventing premature battery drain.Your battery switch plays a vital role in conserving battery power by selectively disconnecting various circuits when not in use.
This prevents parasitic drain—that slow, insidious depletion of power that happens even when your trailer is seemingly off—significantly extending the lifespan of your batteries and ensuring you have power when you need it. Think of it as a power-saving mode for your whole trailer.
Battery Switch Interaction with Other Electrical Components
The battery switch doesn’t work in isolation. It’s intricately connected to other parts of your trailer’s electrical system, forming a synergistic network that optimizes power distribution. For example, when the switch is in the “off” position, it isolates the house batteries from the rest of the trailer’s systems, preventing any drain. When in the “on” position, it allows power to flow to various components like lights, water pumps, and refrigerators.
Furthermore, it interacts with solar panels by allowing them to charge the batteries when the switch is in the “on” or “both” position (depending on the switch configuration). Similarly, an inverter draws power from the batteries when the switch is on, converting DC power from the batteries to AC power for appliances requiring it. Improper switch usage can prevent solar charging or prevent your inverter from functioning correctly.
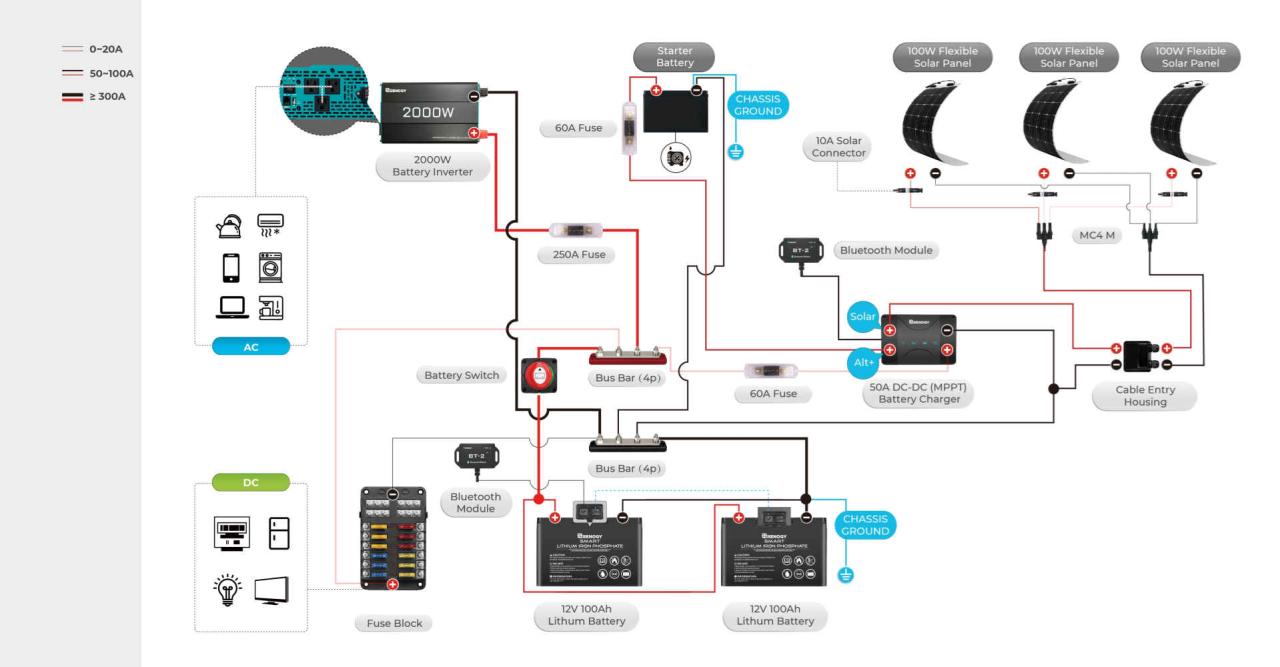
Example Power Management System
Let’s imagine a simple power management system for a travel trailer. It includes a 3-position battery switch (off, battery, both), a 100-watt solar panel, a 1000-watt inverter, and a 12-volt battery bank. The solar panel charges the batteries when the switch is in the “both” or “battery” position. The inverter converts DC power from the batteries to AC power for use by items such as a microwave or a small television.
Okay, so you’re wondering about your travel trailer’s battery, right? Understanding how the battery switch works is key. Check out this helpful guide on the battery switch on travel trailer function to get a solid grasp of the basics. Then, for a slightly different perspective and maybe some extra tips, dive into this other resource about the battery switch on travel trailer function – it might offer some troubleshooting advice you hadn’t considered.
Knowing how to manage your battery is crucial for a smooth trip!
The battery switch allows you to isolate the batteries when not in use to prevent parasitic drain. The system might also include a battery monitor to track battery voltage and state of charge, providing critical information for power management. In this setup, careful management of the battery switch ensures optimal utilization of solar power and prevents unnecessary battery drain.
For example, during extended periods of non-use, switching to the “off” position conserves battery life, preventing the gradual depletion of stored energy.
Battery Switch Maintenance and Replacement: Battery Switch On Travel Trailer Function

Keeping your travel trailer’s battery switch in good working order is crucial for reliable power. Regular maintenance prevents costly repairs and ensures you’re always ready for your next adventure. Neglecting maintenance can lead to corrosion, poor connections, and ultimately, battery switch failure, leaving you stranded without power.Regular maintenance and occasional replacement are key to ensuring your battery switch functions correctly for years to come.
A well-maintained switch will provide consistent and safe power to your trailer’s electrical system.
Regular Maintenance Schedule
A simple yearly inspection is recommended, ideally before your first trip of the season. More frequent checks might be needed if you live in a particularly humid or salty environment. This involves visually inspecting the switch and its connections for any signs of damage or corrosion. For trailers stored outdoors, semi-annual inspections are advisable. For those stored indoors, a yearly inspection is usually sufficient.
Inspecting for Corrosion and Wear
Corrosion is a common enemy of battery switches. Look closely at the terminals and the switch body itself. Greenish or whitish deposits indicate corrosion. Loose connections are another problem; gently wiggle the cables to see if they are securely attached. Check for any signs of physical damage like cracks or broken parts on the switch housing or the connecting wires.
If you see any significant corrosion or damage, it’s time to take action.
Replacing a Faulty Battery Switch
Replacing a battery switch is a straightforward process, but safety should always be your top priority. Always disconnect the battery’s negative terminal before beginning any work. This prevents accidental short circuits and potential injury.
- Disconnect the Battery: Use a wrench to disconnect the negative (-) terminal of your battery first. Then disconnect the positive (+) terminal. This is crucial for safety.
- Remove the Old Switch: Carefully remove any screws or fasteners holding the switch in place. Take photos before removing anything, as this can help with reassembly. Note the wiring configuration before disconnecting the wires.
- Disconnect the Wires: Disconnect the wires from the old switch. Label them clearly (e.g., using masking tape and a marker) to avoid confusion during reinstallation. This will ensure the new switch is wired correctly.
- Install the New Switch: Mount the new switch in the same location as the old one. Secure it with the appropriate screws or fasteners.
- Reconnect the Wires: Carefully reconnect the wires to the new switch, matching them to your labels. Ensure all connections are tight and secure.
- Reconnect the Battery: Reconnect the positive (+) terminal and then the negative (-) terminal to the battery. Double-check all connections.
- Test the Switch: Turn the switch on and off to ensure it’s working correctly. Check the power to your trailer’s appliances to confirm the switch is functioning properly.
Tools and Materials, Battery switch on travel trailer function
Before starting, gather the necessary tools and materials. Having everything ready will make the job go much smoother.
- Wrench (to disconnect the battery terminals)
- Screwdriver (appropriate size for the switch mounting screws)
- Wire brush (to clean corrosion from terminals)
- Electrical tape (to insulate connections, if needed)
- New battery switch (ensure it’s the correct type and amperage for your system)
- Safety glasses
- Gloves
- Optional: Wire strippers and crimpers (if replacing wires)
Battery Switch and Safety Regulations
Safe operation of your travel trailer’s battery system is paramount, not only for the longevity of your equipment but also for your personal safety. Ignoring safety regulations can lead to serious consequences, including fire, explosions, and injury. Understanding and adhering to relevant standards is crucial for a safe and enjoyable RVing experience.Proper battery handling and switch usage are key components of safe RV operation.
Regulations surrounding RV electrical systems aim to minimize risks associated with high-voltage DC power and flammable gases produced by batteries. These regulations often cover aspects like battery placement, ventilation, cabling, and switch functionality, all of which directly impact safety.
RV Battery System Safety Standards
Many countries and regions have specific standards for RV electrical systems. These often align with broader electrical safety codes but include additional considerations relevant to the mobile and often confined nature of RVs. For example, regulations might specify minimum distances between batteries and flammable materials, requirements for proper ventilation to prevent gas buildup, and specific guidelines for wiring gauge and protection devices like fuses and circuit breakers.
Consulting your RV’s owner’s manual and local electrical codes is essential for ensuring compliance. These codes often dictate the type of battery switch appropriate for the size and type of battery system.
Safe Battery Handling Procedures
Safe battery handling practices should always be followed. This includes wearing appropriate safety glasses and gloves when working with batteries, ensuring proper ventilation to avoid exposure to potentially harmful gases, and never working on a battery system while it is connected to a charger or other power source. Properly securing batteries to prevent movement during travel is also critical to avoid short circuits or damage.
Before making any connections or adjustments, always disconnect the battery switch to ensure the circuit is completely de-energized.
Battery Switch and Fire Prevention
A properly functioning battery switch is a crucial element of fire prevention in an RV. By isolating the battery from the rest of the electrical system when not in use, it significantly reduces the risk of electrical fires. A switch that’s corroded, loose, or malfunctioning can create sparks or overheating, leading to potential ignition of flammable materials. Regular inspection and maintenance of the battery switch, including cleaning and tightening connections, are essential for maintaining its effectiveness.
Using a properly sized switch for the amperage of your battery system is also critical to prevent overheating and failure.
Emergency Procedures and Response
Having a clear understanding of emergency procedures in case of a battery-related incident is crucial. This includes knowing how to quickly disconnect the battery switch in case of a fire or other emergency, and having a fire extinguisher readily accessible and knowing how to use it. Furthermore, understanding the potential hazards of working with batteries, such as the release of flammable hydrogen gas, and knowing how to mitigate these risks, is essential for maintaining a safe RV environment.
Mastering your travel trailer’s battery switch isn’t just about convenience; it’s about safety and extending the life of your batteries. By understanding the different types of switches, following safe connection procedures, and performing regular maintenance, you’ll ensure reliable power and avoid costly repairs. Remember to always prioritize safety and consult a professional if you’re unsure about any aspect of your RV’s electrical system.
Happy travels!
FAQ Insights
What size fuses should I use with my battery switch?
Fuse size depends on the amperage of your battery system. Consult your RV’s wiring diagram or a qualified electrician to determine the appropriate fuse size.
How often should I clean my battery terminals?
Clean your battery terminals at least twice a year, or more often if you notice corrosion. This prevents poor connections and potential power issues.
Can I use a battery switch with a solar panel system?
Yes, but proper wiring is crucial. The battery switch should be incorporated into your solar panel system’s charging circuit, typically after the charge controller.
What happens if I accidentally reverse the battery polarity?
Reversing polarity can damage your battery, switch, and other electrical components. Always double-check polarity before connecting your batteries.
